NB | DESK 211/280 User Manual (FW v2.4)
This manual describes how to use the HW revision 1.1 of the NB | DESK with installed firmware version 2.4.
Content
Hardware
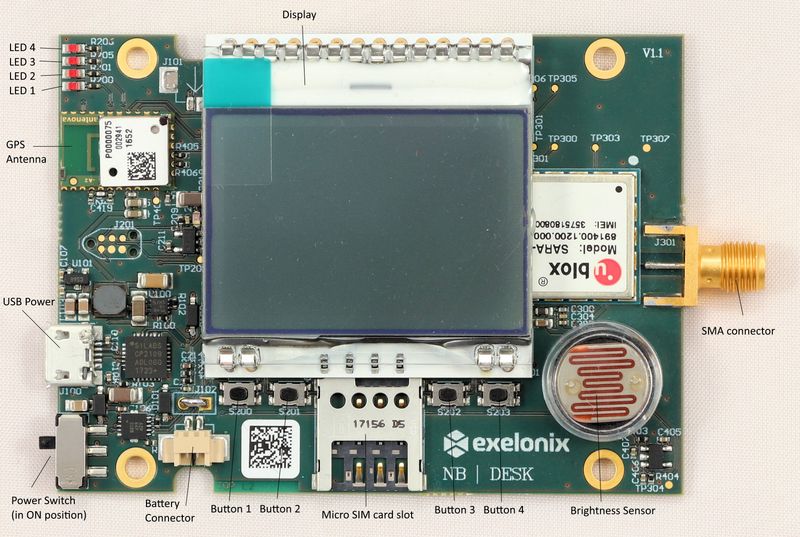
USB Connector
- Micro USB connector
- Power supply
- Charge attached battery
- Used to power hardware in case no battery is connected
- Serial connection (see NB | DESK 211/280 User Manual (FW v2.4)#Advanced Features)
Power Switch
- PowerUp (push in direction to USB) / PowerDown complete hardware
- If set to PowerDown, the battery cannot be charged
SIM card slot
- NB-Iot micro SIM card
- NB-IoT nano SIM card with adapter
LEDs
- LED1: turned on if device is powered on
- LED2: turned on if microcontroller is reading & updating sensor values
- LED3: turned on if modem is attached to a NB-IoT cell
- LED4: turned on if a modem procedure (attach, transmit, receive, ...) is ongoing
Buttons
- Button 1:
- triggers the transmission (short TX) of all new sensor values; if no value has changed since last successful transmission no TX will be triggered
- if the modem is powered off it will power on the modem
- if the modem is detached it will try to attach to a NB-IoT cell
- if the modem is attached it will trigger sending the sensor data to the Exelonix cloud
- Button 2:
- if the modem is attached to a cell it will detach the modem from this cell
- if the modem is already detached, then it will power down the modem
- Button 3:
- Switches the display to the previous page
- if the current page is page 1 then the last page will be shown next
- Button 4:
- Switches the display to the next page
- if the current page is the last page then the first page will be shown next
Display
Backlight
The display has an orange backlight to increase readability. After the device is powered on or after a button was pressed the backlight will turn on.
It will automatically turn off again after 1min if the device is only powered by battery or after 5min if the device is powered by USB.
Footer
The footer indicates in the middle the currently displayed page number and left/right to that with small letters the functionality of the buttons
- "TX" - Transmission triggered via button 1
- "D" - Disconnect triggered via button 2
- "<<" - Switch to previous display page
- ">>" - Switch to next display page
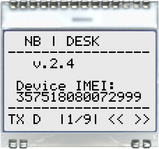
Page 1 - "NB | DESK"
This page is only shown during boot up of the device after turning on the power switch.
It displays the installed NB | DESK software version and after the modem booted also the unique identifier (in this case the modem IMEI) of the device.
Page 2 - "NB-IoT"
The NB-IoT page displays the current status of the NB-IoT modem and the result of the last NB-IoT transmission (not shown if device is not attached or a transmission is currently ongoing).
The following example shows the modem in attached state and the last triggered transmission result was successful.
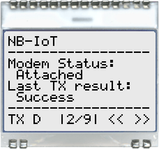
The modem status state machine is described in the follwoing diagram.
Modem States:
- Power Off: The modem is not power on. In case button 1 is pressed the device will be powered on, starting to attach to the network and transmit the sensor values.
- Detached: The modem is powered on and still not attachted to the network. In case button 1 is pressed the device will start to attach to the network and transmit the sensor values.
- Attaching: The modem is currently trying to attach to the network. Depending on the network conditions this can take a while. If this is failing immediately, this could mean that no SIM card is installed. For more information see the troubleshooting chapter.
- Attached: The modem is attached to the server; an transmission can be started
- Transmitting: The modem is transmitting the sensor data
- Receiving: The modem is waiting for the Acknowledgment from the server
The "Last TX result" can have the following values:
- Success: everything went fine; the server received the latest sensor values
- Attach failure: The modem was unable to attach to the network, so no transmission was possible
- TX failure: The modem was unable to trigger the transmission
- RX timeout: The modem did not receive an acknowledgment from the server; It is unknown if the transmission was successful or not
- RX failure: The server answered with an error, so the transmission was not successful
Page 3 - "Cell (1/3)"
This page shows the basic cell parameters if the modem is attached to a cell.
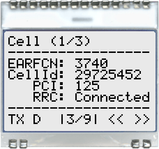
- EARFCN: E-UTRA Absolute Radio Frequency Channel Number
- Cell ID: Global cell identifier
- PCI: Physical cell ID
- RRC: The state of the Radio Resource Control (RRC). It defines if the modem is connected with the NB-IoT base station: Idle or Connected
Page 4 - "Cell (2/3)"
This page shows the current power values of the cell connection if the modem is attached to a cell.
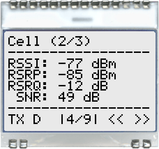
- RSSI: Receive Signal Strength Indicator in dBm
- RSRP: Referenz Signal Received Power in dBm
- RSRQ: Reference Signal Received Quality in dB
- SNR: Signal-To-Noise ratio in dB
Page 5 - "Cell (3/3)"
This page shows additional values of the cell connection if the modem is attached to a cell.
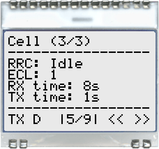
- RRC: The state of the Radio Resource Control (RRC). It defines if the modem is connected with the NB-IoT base station: Idle or Connected
- ECL: NB-IoT coverage enhancement level; range: level 0 to level 2. It is up to the network, how many CE levels are defined.
- Level 0 corresponds to normal coverage
- Level 2 corresponds to the worst case, where the coverage may be assumed to be very poor.
- RX time: active time of the modem RF to receive signals
- TX time: active time of the modem RF to transmit signals
Page 6 - "Sensors"
This page displays the last read sensor values.
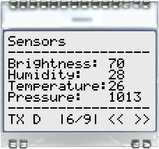
- Brightness: Percentage of maximum measurable brightness of the attached sensor. (0% darkest, 100% brightest)
- Humidity: Percentage of relative humidity at current temperature (see below)
- Temperature: current temperature in Celcius. Could be higher than the current room temperature due to heat output by device
- Pressure: Atmospheric pressure in hPa (hector Pascal)
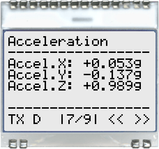
Page 7 - "Acceleration"
Proper acceleration given as a vector (x,y,z) measured due to Earth's gravity g = 9.81 m/s2
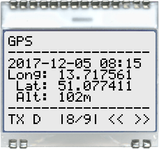
Page 8 - "GPS"
The GPS module is powered on together with the modem. After that the GPS automatically starts searching for the current position.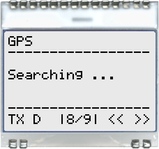
Depending on the GPS signal strength the initial positioning can take more than one hour.
The result shows the timestamp of the last GPS signal reception, the longitude, latitude, and altitude (in meter).
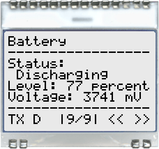
Page 9 - "Battery"
The battery page shows the current status of the attached battery.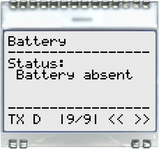
The battery status can be:
- Absent: e.g. the battery cable is not connected anymore or the battery/cable is broken
- Discharging: the USB power is not attached - the device is powered only by the battery
- Charging: the USB power is attached - the battery is charged
- Level too low: the USB power is not attached and the battery level is too low to power the device; the device will power down in a view seconds the save the battery from completely discharging
- Powering Down: the device is powering down - the display will be turned off
→ attach the USB power and turn the device off and on again
The battery level is given in the range of 0 ... 100%.
- If the level is higher than 3900mV, the level will be set to 99%
- If the level is lower than 3200mV, the level will be set to 1%
- If the level drops below 3300mV the battery status switches to "Level too low"
Advanced Features
Serial Connection
It is possible to have a look at the internal debug messages and talk with the U-blox SARA N2XX modem directly via AT commands.
To do this the NB|DESK USB needs to be connected to a PC via a USB cable. Then the device is recognized as a COM port with the name "Silicon Labs CP210x USB to UART Bridge".
The OS driver can be found on the Silicon Labs Website.
Open a serial console (e.g. U-blox m-center) on the attached PC with the following COM port settings:
- Baud rate: 115200
- Flow control: none
- Data bits: 8
- Stop bits: 1
- Parity: none
After the COM port is connected the NB|DESK with print its debug message on the console. By default, the console is spammed with information about the periodic update of the sensor values.
It is possible to disable/enable these by sending the lower case letter "l" via console to the device.
After the modem has booted it is possible to send AT commands (starting with "AT+") directly to the modem.
The AT manual can be found on U-blox website: SARA-N2_ATCommands_(UBX-16014887).pdf
Tunnel Mode
If you don't want to use any of the NB|DESK functionality (automatic connection, sending of sensor data) and only want to talk to the modem via AT commands you can put the device in a so-called "tunnel mode".
This can be achieved by sending character "a" via serial console after the device booted. From now on everything typed in the console will be sent directly to the modem and everything received from the modem will be printed out as is.
These are the basic AT commands you need to attach to a cell and transmit data via UDP:
- Turn on the module’s radio functionality: AT+CFUN=1
- trigger automatic attach: AT+CGATT=1
- Check the registration status (0-notConnected,1-registeredHome,2-searchingCell,5-registeredRoaming): AT+CEREG?
- Create a UDP socket: AT+NSOCR=DGRAM,17,<localport>
- Sending data: AT+NSOST=0,<remote_address>,<remote_port>,<length>,<dataInHexString>
- Check cell information: AT+NUESTATS?
See the AT manual for information.
Troubleshooting
- In case the device does not react anymore (e.g. button 3 does not switch display page) the device can be rebooted by turning it off and on again.
- NB-IoT Connection Issues
- From our experience, there is no need to set the APN by hand, as it is done automatically by the modem.
- The installed U-blox SARA N2 modem only supports specific frequency bands. Check the U-blox SARA-N2 website to see which SARA module support which band.
- If the device connects for the first time to the network it can take up to 1h before the attach is successful. After that, the next attaches are much faster (in most cases it takes no longer than 30s).
- By default, the modem is configured to support the 3GPP CRs 0354/0338 & 0859. This can be checked by sending "AT+NCONFIG?". Please check if these are supported by your cell. If not the config can be changed with:
- AT+NCONFIG=CR_0354_0338_SCRAMBLING,"FALSE"
- AT+NCONFIG=CR_0859_SI_AVOID, "FALSE"