NB|EASY User Manual
NB|EASY is a tool to use Vodafone NB devices via a PC.
The NB device, connected via USB with the PC, can be triggered to attach to the Vodafone NB-IoT network. After the connection is successful the device is able to transmit data via the NB-IoT network and collect data of the cell conditions.
The application is split into four main parts. Each can be selected by clicking on the corresponding tab. The following sections describe these tabs.
Content
Version History
The following table shows the changes done with every NB | EASY version:
| Version | Date | Changes |
|---|---|---|
| 1.5 |
| |
| 1.4 |
| |
| 1.3 |
| |
| 1.2 |
| |
| 1.1 |
| |
| 1.0 |
|
Software Installation
Basic software requirements
- Java 8 runtime environment
- UART driver for your device
Windows
- Use the windows executable from the download page to install NB | EASY software
- The installer will take care of installing the Java environment and the required drivers
- Start the program via the desktop shortcut or start menu entry
Linux
- Connect the device via USB
- Check whether your distribution provides the required UART driver for your device:
- NB|DESK 211/280 or NB|USB 211/280
- The required UART driver has been distributed as part of the Linux kernel since v2.6.12
- Check whether the required kernel module is loaded:
lsmod | grep cp210x
- NB|USB R410M
- The required UART driver has been distributed as part of the Linux kernel since v4.4.132
- Check whether the required kernel module is loaded:
lsmod | grep option
- NB|DESK 211/280 or NB|USB 211/280
- Check whether you have read/write access to the USB-UART bridge:
ls -la /dev/ttyUSB*
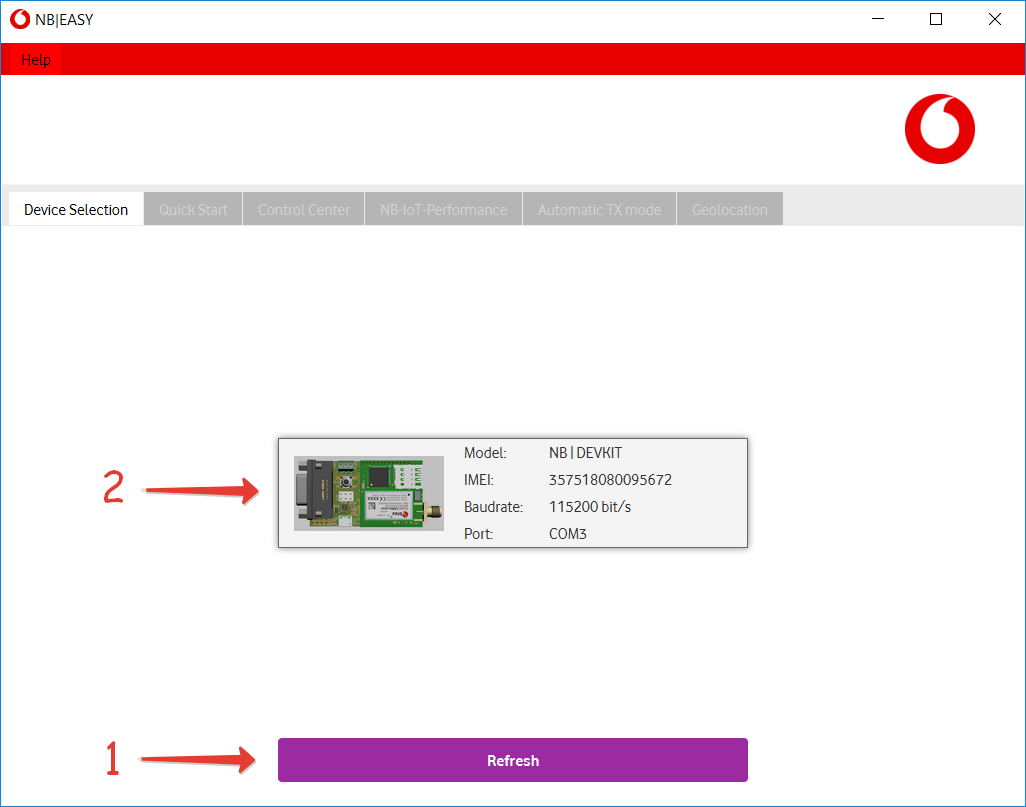
Device Selection
After starting the application, the Device Selection tab is shown first. Here the to be controlled NB device can be selected.
- The Refresh button starts a new search of connected NB devices via COM port. An ongoing search is indicated by a moving progress bar below the button.
- After the search is finished all available device are displayed. By clicking on one of them the device is selected for usage. After that the Quick Start tab is shown.
Quick Start
The Quick Start tab presents an simplied way to get familiar with the connected NB device and the NB-IoT network.
Here the device can be triggered to attach to the NB-IoT network and transmit sample data to the cloud.
Device State
The top area of the application shows the selected device and its current state.

- Device name and its parameters
- Name of selected NB device and its hardware revision
- Firmware version installed on the NB device
- EASY interface version used by the NB device
- Number of COM port used by selected device
- Modem Status: shows the current status of the device.
- Attach to network: triggers an Attach or Detach of the device depending on the modem status
The modem status indicates the following values:
Modem Status | Description |
|---|---|
PowerOff | The modem is not power on. |
| PoweringUp | The modem is currently powering on. |
| PoweringDown | The modem is currently powering down. |
| Detached | The modem is powered on but not attachted to the network. |
| Attaching | The modem is currently trying to attach to the network. |
| Attached | The modem is attached to the NB-IoT network |
| Detaching | The modem is currently detaching from the network. |
| Transmitting | The modem is transmitting data. |
| Receiving | The modem is receiving data from the network. |
Detached
In the detached state the device is not yet able to transmit data via the NB-IoT network. First an attach procedure needs to be triggered.
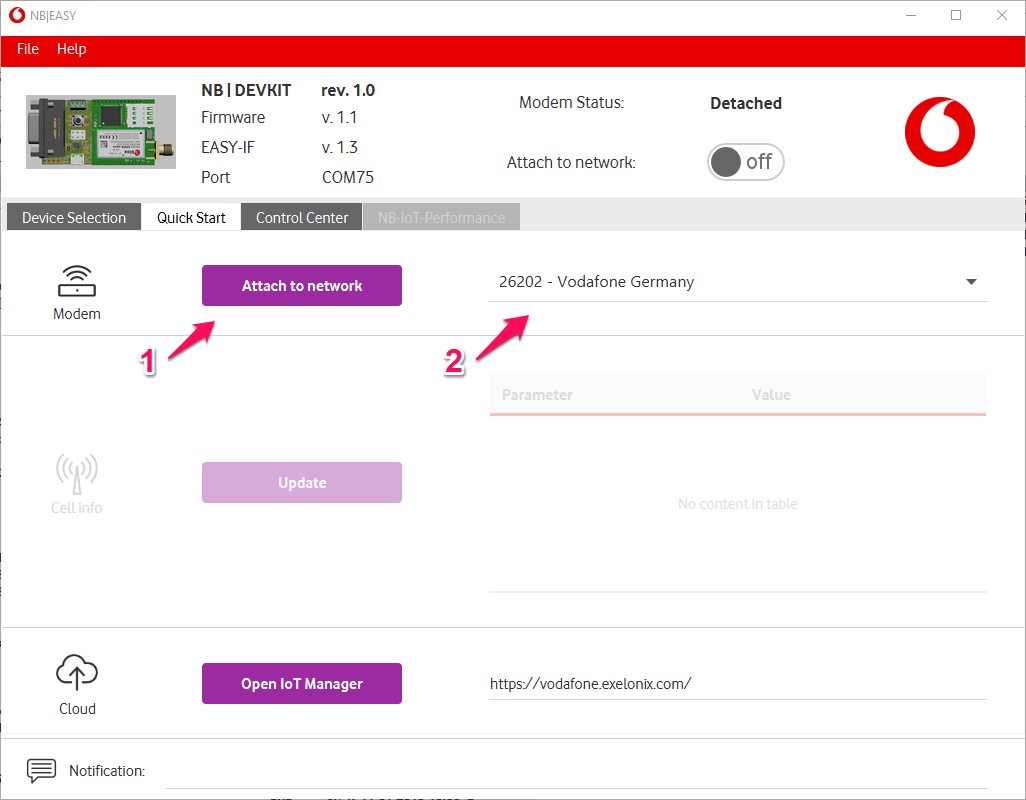
- Button to start the attachment procedure to the selected NB-IoT network.
- Drop down menu to select the NB-IoT network to attach to. Be aware that the inserted SIM card must correspond to the selected network, otherwise the attach procedure will fail.
Attached
In the attached state the device is now able to transmit data via the NB-IoT network.
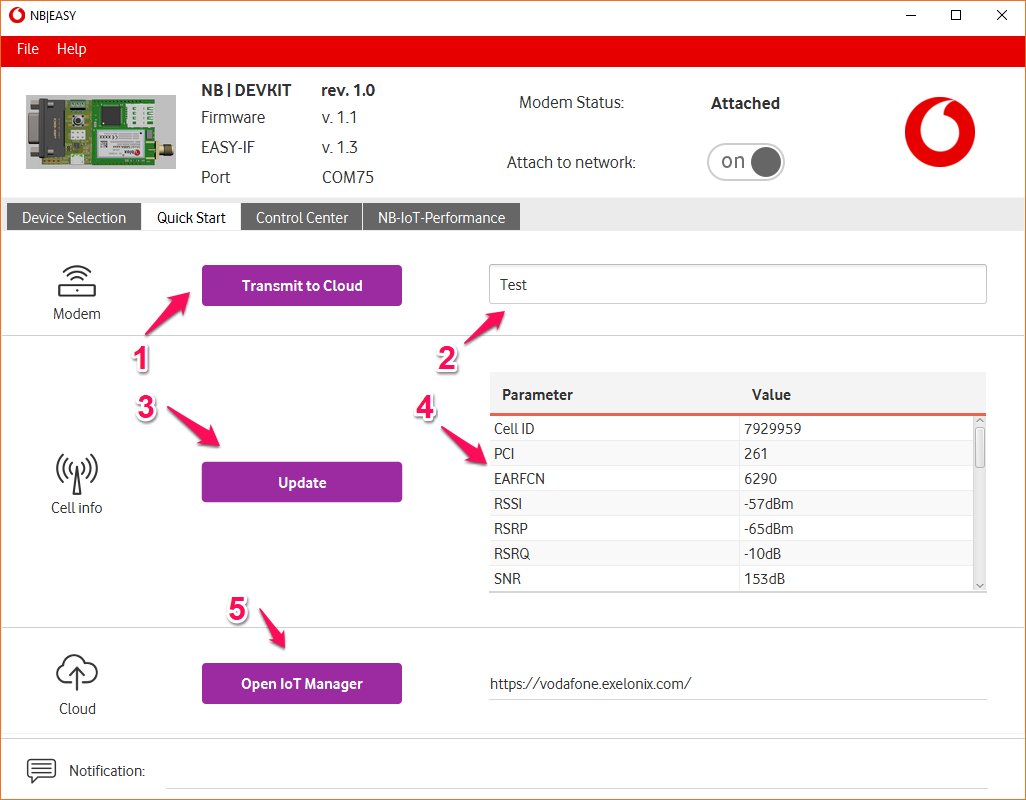
- Button to start a transmission to the cloud of the entered text (in 2.) and the current cell information.
- Text field to enter example text to be transmitted when button 1. is pressed.
- Button to start a cell information update
- List which shows all received cell information of the last successful cell information update
- Button to open IoT Manager website to view all successfully transmitted values.
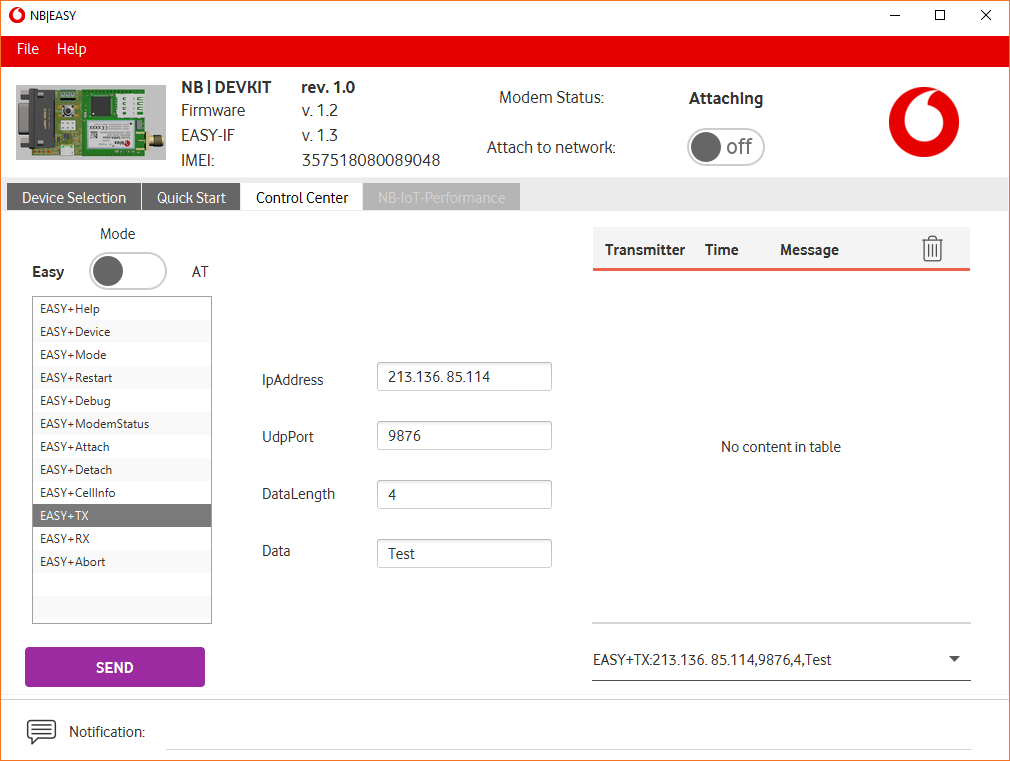
Control Center
The control center is a more advanced and detailed view of how the NB|EASY tool communicates with the NB device.
Here the user can select an message and send it to the device.
There are two types of device. Devices which support the EASY interface (like the NB|DEVKIT) and devices which only support AT commands (like the NB|USB).
Devices which are operating in EASY mode can be switched to AT mode, but not vice versa.
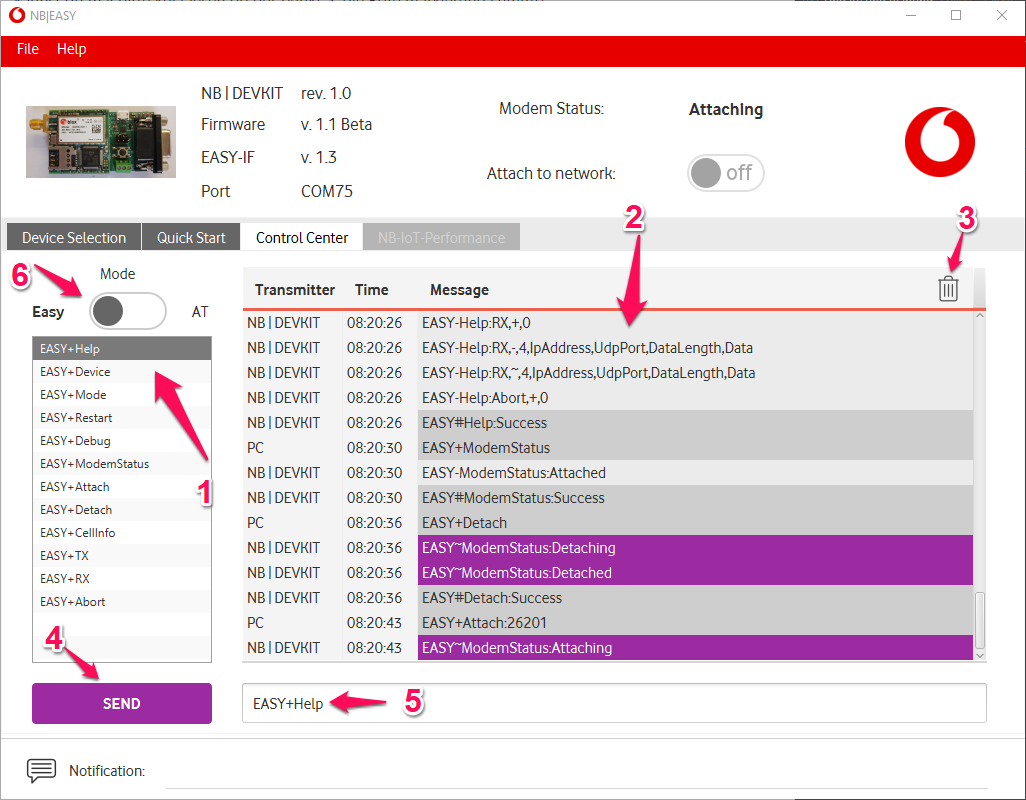
- Select a single message to be sent to the device. The message string will be copied to message text field 5.
- List view of transmitted and received window.
- Button to empty list view 2.
- Button to start sending of the message in 5 to the device.
- Message text field. The message to be sent to the device can be edited further.
- Button to enable AT mode in case the device is currently in EASY mode.
Change Endpoint
Devices send data to the Vodafone backend by default. If you want your devices to send data to another backend, you can change the destination IP address.
Switch to Control Center and select EASY+TX from the right list of commands and fill in IP and Port of the backend you want to send data to. Add the payload to the Data field and adjust the DataLength field.
The default IP address of Vodafone is 213.136.85.114 and the Port is 9876.
NB-IoT Performance
The NB-IoT Performance tab compares the NB-IoT RAT (Radio Access Technology) with other common RATs like LTE Cat1, UMTS and GSM used for transmitting small amount of data.
To acces the NB-IoT Performance tab the device needs to be attached to the NB-Iot network first, othrewise the tab is disabled.
The tool uses live data from the NB-IoT network to calculate the expected battery lifetime, energy consumption and datarate.

- Button to start the NB-IoT performance calculation.
The application sends real test data to the Cloud ia NB-IoT to be able to record the needed time and energy consumption in the current NB-IoT cell. - Button to open website which explains the performance calculation and its assumptions in more detail.
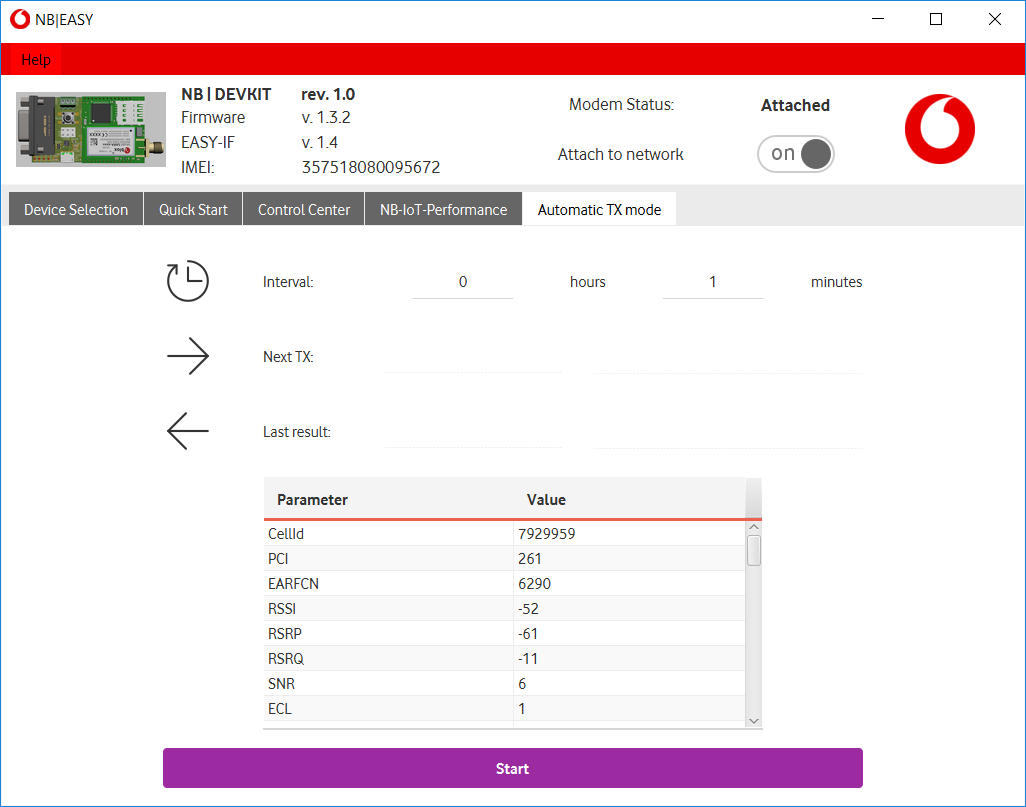
Automatic TX mode
Abbreviations
| Abbreviation | Description |
|---|---|
| NB-IoT | Mobile communication standard "Narrowband Internet-of-Things" |
| NB | Short version of "NB-IoT" |
| RAT | Radio Access Technology |